Photo Viewer HTML Application
Version 1.6


Photo Viewer HTML Application (PVHTA) is an application written in HTML and JavaScript. Therefore, the application relies on a Web Browser to run, much like Web pages. The application is mostly meant to be packaged with your photos for distribution. The idea is that your photo distribution recipients should not need to install any special software, and are still able to enjoy your photos the way you intended.

With this HTML applcation, your package of photos can easily and nicely be viewed by the recipients. They are not required to install any other addition software besides the common IE 5.0 in a Windows (or even Mac?) platform. Moreover, photo description notes as well as background music can be setup in a slide show format for nicer enjoyment of your photos.

Currently, the application can only be run with IE 5.0 or later. In the future, a Netscape 6 verion of the application may be developed.


Thank you for trying out Photo Viewer HTML Application! Your bug reports, comments and suggestions are most welcome! Drop Trevor Lee a few lines telling him how you feel about the simple application.


Here is what you will find in this document:
Notes to those who want to upgrade their distributions with the newer version of the photo viewer:

The author had tried his best to keep the new version of the photo viewer compatible with the older version. Therefore, [hopefully] you can upgrade your distributions with the new version of the photo viewer by simply replacing the contents of the directory .viewer with that of the newer version.


Photo Viewer HTML Applcation is a FREEWARE. You can use it and distribute it free of charge. Should you be interested in bundling Photo Viewer HTML Application with your software product, you are encouraged to notify the author. Moreover, you should not turn Photo Viewer HTML Application into your own production. The author shall retain the rights to the source and the binary of the package. This freeware does not come with any warranty or support of any kind. The author is not responsible for any damage caused due to the use of this program. Bug reports, comments and suggestions are welcome.

Trevor Lee, Wing Sang
E-mail: trev_lee@hotmail.com
Home Page: http://www.geocities.com/tlhome2000/


FAQ


User Guide

The following shows the basic steps to create a photo distribution:
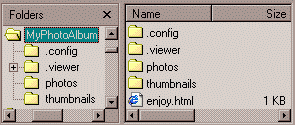
  1. Start with an empty Root Directory. Root Directory is the directory that will eventually contain all files, including your photo files, this photo viewer, and other configuration files. The following picture shows the structure of a sample Root Directory.


    • MyPhotoAlbum is the Root Directory for the particular photo album compilation.
    • .config is the system directory that contains configuration files for the compilation. This photo viewer package comes with a "wizard" for producing the contents of this directory.
    • .viewer is the system directory that contains the photo viewer code.
    • photos is the directory that contains the photo files for the photo album compilation. You are of course responsible for producing the contents of this directory.
    • thumbnails is the directory that [optionally] contains thumbnails of the photo files. You are unluckily responsible for producing the contents of the directory. Please read on for a suggested procedure to produce thumbnails for use by the photo viewer.
    • enjoy.html is the "welcome page" to be opened with IE to view the photo ablum compilations in the photo distribution. This file is created by the "wizard" of this photo viewer package.
    Once completed, you can simply copy the complete contents of this Root Directory to some mass-media for distribution.
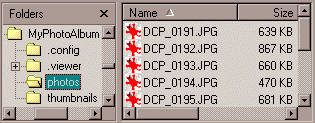
  2. In the Root Directory, you should create a directory called photos, and copy your photo files to the directory. For example:


    Please note that the photo viewer can only handle photo files with the same extension (JPG in this example). For easy referencing, each photo file name is divided into two part -- the name and the extension. E.g., the photo file name DCP_0191.JPG can be divided into the name DCP_0191 and the extension JPG.
    If the photos are not all upright, you may want to use a tool to perform "lossless" rotation on them. One such tools is the free Exifer by Friedemann Schmidt. With the tool, you can easily browse the photos directory, scan through the photo files, and rotate those that need rotation.
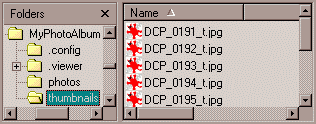
  3. You can choose to provide photo thumbnails for quick and easy preview of your photos. If you decide to do so, you will need to create a directory called thumbnails, and create thumbnails of the photos in the directory. For example:


    Please note that thumbnail file should be named "similar" to the corresponding photo file. Like a photo file name, a thumbnail file name is also divided into two parts -- the name part and the extension part. The photo viewer requires that the thumbnail name (e.g. DCP_0191_t) be prefixed with the corresponding photo name (e.g. DCP_0191). Additionally, all thumbnail files should have the same extension (which can be different than the photo file extensin).
    It is suggested that you use the free IrfanView (by Irfan Skiljan) for thumbnail generation. You can use the menu item File | Thumbnails to bring up the thumbnail tool. With the tool, you can easily browse the photos directory, select all thumbnails shown (Options | Select all), then save the thumbnails as individual image files (File | Save selected thumb as HTML file) in the thumbnails directory. Please note that the thumbnails are suggested to be 200 pixels in size.
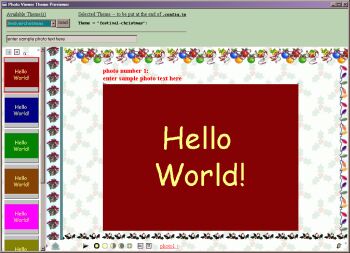
  4. Optionally, you can choose a "theme" to use for your photo compilation. A theme is simply a set of predefined settings for some of the appearance related configuration options (to be discussed later). With such theme support, the same well-designed appearance like background and frame borders can be reused with ease. Later when you use the "wizard", you will have a chance to specify which theme to use. You can preview the "installed" themes with the "theme previewer" previewer.bat in the themes directory. (The "theme previewer" is only available for Windows platforms.)
    It is important to note that the "theme previewer" requires you to "compile" the sample root directory sample-root-dir in prior. Follow the steps mentioned next to use the "wizard" to prepare the sample root directory with the default values.
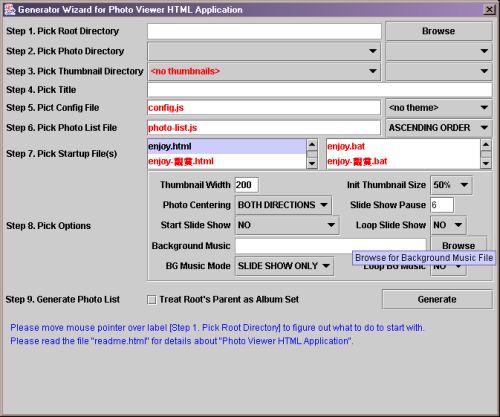
  5. With the Root Directory properly prepared (with photos and optionally thumbnails), you can use the "photo-list wizard" to generated the rest of the needed directories/files.

    The "wizard" is a Java 2 program that requires Java Virtual Machine (JVM) to run. If you do not have JVM installed, you can download and install the [free] reference implementation of JVM -- J2SE Version 1.3 -- from Sun Microsystems. Please note that you will be needing the Java Runtime Environment (JRE), not the SDK unless you will be developing Java programs.
    Chances are that you might alreay have JRE installed without you knowing it, since many "cross platform" programs are developed in Java. You can try the DOS command
    java -version
    if it reports a version of 1.2 or later, you have what the "wizard" needs.
    If you are ready, you can bring up the "wizard" by running the batch file wizard.bat. (The batch file simply contains a set of "shell scripts" that call the JVM to run the "wizard" Java program.)


    Please note that when you run the batch file wizard.bat from DOS prompt, you can supply additional "parameters" to the "wizard" like:
    wizard.bat -nocase -configdir viewerconfig -viewerdir photoviewer

    • [-nocase ] tells that case should not be taken into consideration when the "wizard" compares photo file names. In such a case, all photo file names will be converted to lower case before processing.
    • [-configdir viewerconfig] tells that the config directory .config should be named viewerconfig instead.
    • [-viewerdir photoviewer] tells that the viewer directory .viewer should be named photoviewer instead.
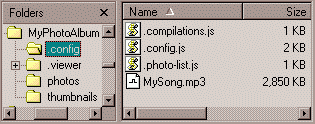
    After successful generation, your photo distribution is basically ready. The following pictures shows the contents of .config after the generation.

    • compilations.js is the (JavaScript) file that describes one or more photo album compilations to be handled by the photo viewer. However, the "wizard" will only generate a single compilation.
    • config.js is the (JavaScript) file populated with the options for setting up the photo viewer for the particular photo album compilation.
    • photo-list.js is the (JavaScript) file that lists out the list of photos included in the particular photo album compilation.
    • MySong.mp3 is the background music file copied to the directory if you choose to have background music for your photo album. Note that the sound/music file is not part of this photo viewer package.
    Nevertheless, if you have the checkbox [Treat Root's Parent as Album Set] checked before generation, the folder containing the root (album) will be treated as a album set container. The effect is that:
    1. A single copy of the photo viewer HTA will be copied to the album set folder, and the photo viewer HTA will be shared between multiple roots (albums).
    2. A single compilation file will be used for multiple roots (albums). The same compilation file will be appended to add entries as more roots (albums) are generated.


Further Customization/Configuration

After generating the basic photo distribution package, you may want to further customize it. The "wizard" doesn't allow you to configure all the customizations possible; you will need a little bit of work to customize your photo distribution closer to your heart's content. When your friends enjoy your photos with carefully selected background music, they will sure appreciate your hardwork.

The photo viewer has a "dialog box" that allows the user to change some of the configuration options at runtime. Nevertheless, you may want to customize your photo distribution package by changing the predefined configurations.

All predefined configurations are "coded" in the three JavaScript files generated by the wizard. To do customizations, you will need to edit them using your favorite TEXT editor.
  1. photo-list.js specifies the title and the list of photo files of the photo album compilation. [It is import to note that the file should be saved in "utf-8" encoding, if the text contains any non-English (non-ASCII) characters.] The "wizard" already entered the necessary data in the file. However, you are still free to modify the file if you see fit.

    • Title is the "variable" that store the "string" of the title of the album.
      Title = "My Birthday Photos"; // the title of the compilation
      The line may seems a little un-natural to you. However, be aware that the above is in fact a JavaScript program line! You are looking at some computer programming language!

      Please note that:

      • A "string" cannot span more than a single line.
      • Anything, in the same line, after the double-slashes // is considered to be comment that will simply be ignored.


    • PhotoData spacifies the list of photos as a list of "string" pairs (photo name and photo note).
      PhotoData = new Array(
        "photo1", "This is photo 1",
        "photo2", "This is photo 2",
        "photo3", "This is photo 3"
      );
      Now, you can start adding photo notes to tag your photos with descriptive captions. You can also reorder the photo sequence by changing which "string" pair come before which.

      Be careful with the comma separator though. Notice that the list of "strings" actually wind up a list of double-quoted "strings" separated by commas. Therefore, the last "string" is not followed by a comma.

      In the future, a "photo-list editor" may be developed to provide GUI to edit the PhotoData "variable" in photo-list.js. Until then, you have to edit the list the harder way.

    • PhotoDir and ThumbnailDir are the directories of the photo files and thumbnail files respectively.
      PhotoDir = "photos";
      ThumbnailDir = "thumbnails";
      Although the paths are usually specified relative to the root directory, the directories can be located outside the root directory. Moreover, the paths can be absolute like c:/myalbum/photos, /myalbum/photos or http:://www.mysite.com/myalbum/photos.

    • PhotoSuffix and ThumbnailSuffix are the suffixs, when appended to the photo name, that make up the photo file name and thumbnail file name.
      PhotoSuffix = ".gif";
      ThumbnailSuffix = "_t.gif";
    • ThumbnailWidth is the width of the thumbnails (in pixels).
      ThumbnailWidth = 200; // in pixels
    • ThumbnailsFlag is the "flag" that configures how thumbnails should be handled.
      ThumbnailsFlag = 2; // 0, 1 or 2 [default: 0]
      0==>no thumbnails
      1==>initially large thumbnails (100%)
      2==>initially small thumbnails (50%)
  2. config.js specifies the different photo viewer configuration settings for a particular photo album comiplation. The "wizard" already entered all the configuration settings you selected when running the "wizard". However, there is still a handful that you need to specify by manually editing the file.

    Please note that the photo viewer has dialog that allows the user to change the configuration options at runtime.

    • InitialWindowSize specifies the initial size of the photo viewer window.
      InitialWindowSize = "800x600"; // [default: "max"]
      null==>normal size
      "max"==>maximum size
      "widthxheight" ==>specific size: width x height
    • AutoStartSlideShow specifies whether you want the photo viewer to start in "slide show mode" or not.
      AutoStartSlideShow = false; // true or false [default: false]
    • SlideShowDelay specifies the delay before automatically advancing to another photo (when in "slide show" mode).
      SlideShowDelay = 6; // in second [default: 6]
      Please note that the actual delay may be longer than specified by SlideShowDelay depending on the option SlideShowDelayMethod.
      SlideShowDelayMethod = 0==>SlideShowDelay + time taken to load the photo
      SlideShowDelayMethod = 1==>SlideShowDelay
      A way to individually specify the delay for all/selected photos is to encode their delays in their photo notes like:
      PhotoData = new Array(
        "INTRO", "<<delay=10>>Hello ... slide show is starting ...",
        "PHOTO1", "This is the first photo of the slid show"
      );
    • SlideShowDelayMethod specifies the delay method to use for automatically advancing to another photo.
      SlideShowDelayMethod = 0; // 0 or 1 [default: 1]
      0==>adaptive ... delay will be started right after the photo is loaded
      1==>strict ... delay will be started right before loading the photo
    • SlideShowAutoLoop specifies whether you want to automatically loop the slide show when it ends.
      SlideShowAutoLoop = false; // true or false [default: false]
      0 or false==>don't auto loop
      1 or true==>auto loop
      2==>auto loop in sync with [timing specified] background music
    • HidePhotoListInitially specifies whether the photo (thumbnails) list -- left panel -- should be hidden by default when the photo viewer starts.
      HidePhotoListInitially = false; // true or false [default: false]
    • HideToolbarInitially specifies whether the toolbar should be hidden initially. Please note that this flag will be ignored if slide show is not started automatically. REMINDER: The key combination Alt-F4 will close the current application.
      HideToolbarInitially = false; // true or false [default: false]
    • ShowToolbarAfterSlideShow specifies that the toolbar should be made visible after slide show.
      ShowToolbarAfterSlideShow = false; // true or false [default: false]
    • PhotoSizing specifies the initial photo "sizing" setting. By default, photos are shown in the right panel "best fit".
      PhotoSizing = -1; // -1, 0 or number > 0 [default: -1]
      -1==>best fit
      0==>custom size as specified by PhotoCustomSizing
      1==>full size
      0.5==>half size
      0.25==>quarter size
    • PhotoCustomSizing specifies the custom sizing "parameter".
      PhotoCustomSizing = 380; // [default: 380]
      between 0 and 10==>custom scale
      >= 10==>custom size in pixel
    • HorizontalCenterPhoto and VerticalCenterPhoto specify whether the photo should be centered horizontally/vertically.
      HorizontalCenterPhoto = true; // true or false [default: true]
      VerticalCenterPhoto = false; // true or false [default: false]
    • TransitionFlag specifies the handling option for the transition effect.
      TransitionFlag = 2; // 0, 1, 2 or 3 [default: 2]
      0==>no transition effect; photo will just disappear, and the next one appear
      1==>"half" transition effect -- for fading photo out only; the next photo will just appear
      2==>"half-full" -- "half" in viewing mode; "full" in slide show mode
      3==>"full" transition effect -- for switching from photo to photo
    • BackgroundMusic specifies the background music sound file.
      BackgroundMusic = "my-song.mp3"; // path relative to .config; null ==> none
      Please note that you can specify a background music to be silent, say, in order to pre-load the background music.
    • BackgroundMusicFlag specifies the option about playing background music.
      BackgroundMusicFlag = 2; // 0, 1 or 2 [default: 2]
      0==>never
      1==>always
      2==>during slide show only
    • BackgroundMusicAutoLoop specifies whether the background music should be looped automatically.
      BackgroundMusicAutoLoop = false; // true or false [default: false]
    • BackgroundMusicAutoRestart specifies whether the background music should restart when showing the first photo, say by "rewinding" a slide show.
      BackgroundMusicAutoRestart = false; // true or false [default: false]
    • TransitionRevealType specifies the transition effect. Try it out yourself.
      TransitionRevealType = -1; // -1, 0, 1, 2, ... 23 [default: -1]
    • FullTransitionDuration specifies how long the "full" transition should be. It is the time taken for the transition from one photo to another.
      FullTransitionDuration = 750; // in ms [default: 750]
      Please note that the original photo will be transited to the next one only after the next photo is loaded. FullTransitionDuration specifies how much time should then take to transit to the next photo.

    • ShowPhotoTextPanelFlag specifies how the photo [note] text show be shown.
      ShowPhotoTextPaneFlag = -1; // 0, 1 or -1 [default: -1]
      0==>never
      1==>always
      -1==>depends on whether photo has photo note text associated
    • DisablePhotoTextPane specifies that the photo [note] text feature should be disabled (user will not be able to "turn on" photo notes even if photo notes are specified).
      DisablePhotoTextPane = true;
    • PhotoTextFontFamily, PhotoTextFontSize, PhotoTextFontWeight, PhotoTextFontHeight and PhotoTextColor specify the font style of the photo note text.
      PhotoTextFontFamily = "'Times New Roman'"; // [default: "'Comic Sans MS', sans-serif"]
      PhotoTextFontSize = "22px"; // [default: "22px"]
      PhotoTextFontWeight = "bold"; // [default: "bold"]
      PhotoTextColor = "blue"; // [default: "darkgreen"]
      Please note that a font size of 22px (22 pixels) is around 16pt (16 points) -- 3/4 of 22 -- in a regular monitor.

    • PhotoTextPaneLineHeight and PhotoTextPaneLineCount together determine the height of the panel where the photo note text is shown.
      PhotoTextPaneLineHeight = 27; // in pixels [default: 27]
      PhotoTextPaneLineCount = 2;
      Please note that the line height should be around 1.2 times of the font size.

    • BackgroundImage, BackgroundImageWidth, BackgroundImageHeight and BackgroundColor specifies the background style of the background. Please note that the background image is always "tiled".
      BackgroundImage = "MyBackground.jpg"; // path relative to .config; null ==> none
      BackgroundImageWidth = 100; // in pixels
      BackgroundImageHeight = 100; // in pixels
      BackgroundColor = "lightblue";
    • HighlightColor specifies the color to highlight the "current" thumbnail. All other thumbnails are framed with BackgroundColor.
      HighlightColor = "red"; // [default: "red"]
    • Theme specifies the appearance theme to use.
      Theme = "season-summer"; // [default: null ==> none]
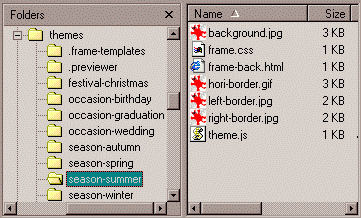
      When you specify that the theme to use is, say season-summer, the photo viewer will look for the theme specific configuration extension file theme.js from the directory .config/themes/season-summer. Therefore, you should also copy the complete contents of the theme directory season-summer

      from
      to
      If you are interested in developing your own theme and need directions, send Trevor Lee an e-mail. He will definitely try to come up with some more documentations about theme development.

  3. compilations.js specifies the photo album compilations of the distributions. The "wizard" already entered one photo album compilation. However, you can always add more.

    • Compilations spacifies the list of photos as a list of "string" triples (compilation title, "photo list" file and configuration file).
      PhotoData = new Array(
        "All My Birthday Photos", "photo-list.js", "config.js",
        "Photo Selections Slide Show", "slide-photo-list.js", "slide-config.js"
      );
      You can add more photo album compilations as you wish. Start with copies of the "photo list" file and the configuration file generated by the "wizard", then edit the copies to be used by another album compilations.

      Be careful with the comma separator though. Notice that the list of "strings" actually wind up a list of double-quoted "strings" separated by comma. Therefore, the last "string" is not followed by a comma.


Advanced Customization/Configuration

There are still some more advanced customizations that you may want to consider:
  1. Althoug the "wizard" only allows you to specify a single background music/song file, you are allowed to specify multiple background songs in order to avoid repeating the same background song during slide-showing your photos. You will need to manually edit the file config.js.

    The "variable" BackgroundMusicList specifies a list of background music files to be used in succession.
    BackgroundMusicList = new Array(
      "MySong1.mp3:195",
      "MySong2.mp3:213",
      "MySong3.mp3:169"
    );
    The above example specifies three MP3 files as the background music/song files. Each music/song file "string" is suffixed with the length (in seconds) of the music/song. (You can open the music/song file with Windows Media Player to find out how long the song/music is.) E.g. the file "string" MySong1.mp3:195 refers to the music/song file MySong1.mp3 which needs 195 seconds to play.

    Notice that the last music/song file "string" is not followed by a comma.

    BTW. It is also possible to specify how long a background music/song is like:
    BackgroundMusic = "TheOnlyBackgroundSong.mp3:200";
    for the sake of better control over slide-show/background-music looping.

    Also, you can specify a background music to be silent, say, in order to pre-load the background music.
    BackgroundMusicList = new Array(
      "<<silent>>the-bg.mp3:5",
      "the-bg.mp3:213"
    );
  2. Usually, enjoy.html -- the compilation selection page -- is the first page your friends will need to visit before actually seeing your photos. In fact, you can provide your own such compilation selection mechanism. Basically, what you have to do is to setup some "cookies" before calling the photo viewer. Here is what you need to do:

    • Setup values for the following three cookies:

      • pvhta.lang -- the language of the UI. The possible values are:

        • en
        • -- English
        • zh-big5
        • -- Traditional Chinese
        • zh-gb
        • -- Simplified Chinese

        If you do not specify the language to use, the default (English) will be used.

      • pvhta.compilationLoc -- the location of compilations.js. Usually you do not need to specify such a "cookie" since the photo viewer assumes a default directory structure.

      • pvhta.compilation -- the [zero-based index of] compilation specified in compilations.js. If you do not specify the compilation, and there are more than one compilation specified in compilations.js, the user will be prompted to selection one.

    • Open the photo viewer .viewer/viewer.html in a new window.


  3. If you set up a slide-show with background song(s), you may need to worry about synchronization of the ending/looping of them. The following table shows how you can somewhat control the synchronization. Please note that the precondition is that you specify the "timing" of the background song(s) as state above.
    SlideShowAutoLoop BackgroundMusicAutoLoop BackgroundMusicAutoRestart
    slide-show and background songs are independent true or false false
    background songs will restart when showing the first photo true or false true
    looping of slide-show is synchronized with the ending/looping of the background songs 2

Relationships of Various Files

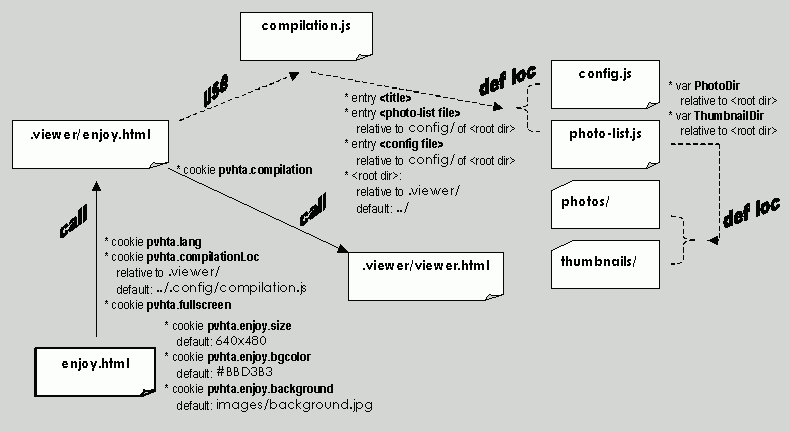
The following diagram shows the major relationships of the various files like enjoy.html, compilations.js, config.js, photo-list.js, photo viewer files (.viewer/*), photo files (photos/*) and thumbnail files (thumbnails/*).
In particular, you can see that:
  1. You can "move" the photo/thumbnail files to other directories by modifying photo-list.js to specify different values for variables like
    PhotoDir = "/photo-home/collection1/photo";
    ThumbnailDir = "/photo-home/collection1/thumbnails";
    Please note that:

    • If relative path is used, it should be relative to the root directory of the photo album.
    • HTTP path like http:://www.mysite.com/photo-home/collection1/photo is acceptable.


  2. With similar steps mentioned in the previous point, you can "tell" photo viewer that you have manually renamed the photo/thumbnail directories.

  3. You can "move" the root directory away from the viewer itself. In fact, multiple photo albums can share the same viewer by changing how enjoy.html should looks for compilation.js. To do so, you will take the following steps:

    • In order to specify the location of compilation.js, modify the generated enjoy.html adding the line
      SetCookie("pvhta.compilationLoc", "/collections/album1/compilations.js", false);
      after the line
      SetCookie("pvhta.lang", lang, false);
    • In order to specify the root directory [for a particular compilation], you will need to modify compilation.js like:
      PhotoData = new Array(
        "Birthday Photos", "photo-list.js", "config.js@config-files@/collections/album1"
      );
      Notice that the last entry (used to sepcify config.js) is now encoded with:

      1. config-files -- the configuration file subdirectory [in the root directory] where files like photo-list.js and config.js are located

      2. /collections/album1 -- the path to the root directory


    Please note that the above assumes that enjoy.html is located in the same parent directory where the viewer directory .viewer is.

    In fact, you can even "separate" enjoy.html and the viewer by modifying enjoy.html itself. You will have to locate the 3 places where the directory .viewer and change those instances to where the actual photo viewer is located.

  4. With similar steps mentioned in the previous point, you can "tell" photo viewer that you have manually renamed .viewer and/or .config.

    For example, if you rename .viewer to VIEWER and .config to CONFIG

    1. Modify enjoy.html:

      • change from
        SetCookie("pvhta.compilationLoc", "../.config/compilations.js", false);
        to
        SetCookie("pvhta.compilationLoc", "../CONFIG/compilations.js", false);
      • change all three instances of
        .viewer/
        to
        VIEWER/
    2. Modify compilations.js:

      change from
      config.js
      to
      config.js@CONFIG